This is the tiny developer documentation for Hono.
# Start of Hono documentation
# Hono
Hono - _**means flameπ₯ in Japanese**_ - is a small, simple, and ultrafast web framework built on Web Standards.
It works on any JavaScript runtime: Cloudflare Workers, Fastly Compute, Deno, Bun, Vercel, Netlify, AWS Lambda, Lambda@Edge, and Node.js.
Fast, but not only fast.
```ts twoslash
import { Hono } from 'hono'
const app = new Hono()
app.get('/', (c) => c.text('Hono!'))
export default app
```
## Quick Start
Just run this:
::: code-group
```sh [npm]
npm create hono@latest
```
```sh [yarn]
yarn create hono
```
```sh [pnpm]
pnpm create hono@latest
```
```sh [bun]
bun create hono@latest
```
```sh [deno]
deno init --npm hono@latest
```
:::
## Features
- **Ultrafast** π - The router `RegExpRouter` is really fast. Not using linear loops. Fast.
- **Lightweight** πͺΆ - The `hono/tiny` preset is under 14kB. Hono has zero dependencies and uses only the Web Standards.
- **Multi-runtime** π - Works on Cloudflare Workers, Fastly Compute, Deno, Bun, AWS Lambda, or Node.js. The same code runs on all platforms.
- **Batteries Included** π - Hono has built-in middleware, custom middleware, third-party middleware, and helpers. Batteries included.
- **Delightful DX** π - Super clean APIs. First-class TypeScript support. Now, we've got "Types".
## Use-cases
Hono is a simple web application framework similar to Express, without a frontend.
But it runs on CDN Edges and allows you to construct larger applications when combined with middleware.
Here are some examples of use-cases.
- Building Web APIs
- Proxy of backend servers
- Front of CDN
- Edge application
- Base server for a library
- Full-stack application
## Who is using Hono?
| Project | Platform | What for? |
| ---------------------------------------------------------------------------------- | ------------------ | ----------------------------------------------------------------------------------------------------------- |
| [cdnjs](https://cdnjs.com) | Cloudflare Workers | A free and open-source CDN service. _Hono is used for the API server_. |
| [Cloudflare D1](https://www.cloudflare.com/developer-platform/d1/) | Cloudflare Workers | Serverless SQL databases. _Hono is used for the internal API server_. |
| [Cloudflare Workers KV](https://www.cloudflare.com/developer-platform/workers-kv/) | Cloudflare Workers | Serverless key-value database. _Hono is used for the internal API server_. |
| [BaseAI](https://baseai.dev) | Local AI Server | Serverless AI agent pipes with memory. An open-source agentic AI framework for web. _API server with Hono_. |
| [Unkey](https://unkey.dev) | Cloudflare Workers | An open-source API authentication and authorization. _Hono is used for the API server_. |
| [OpenStatus](https://openstatus.dev) | Bun | An open-source website & API monitoring platform. _Hono is used for the API server_. |
| [Deno Benchmarks](https://deno.com/benchmarks) | Deno | A secure TypeScript runtime built on V8. _Hono is used for benchmarking_. |
| [Clerk](https://clerk.com) | Cloudflare Workers | An open-source User Management Platform. _Hono is used for the API server_. |
And the following.
- [Drivly](https://driv.ly/) - Cloudflare Workers
- [repeat.dev](https://repeat.dev/) - Cloudflare Workers
Do you want to see more? See [Who is using Hono in production?](https://github.com/orgs/honojs/discussions/1510).
## Hono in 1 minute
A demonstration to create an application for Cloudflare Workers with Hono.

## Ultrafast
**Hono is the fastest**, compared to other routers for Cloudflare Workers.
```
Hono x 402,820 ops/sec Β±4.78% (80 runs sampled)
itty-router x 212,598 ops/sec Β±3.11% (87 runs sampled)
sunder x 297,036 ops/sec Β±4.76% (77 runs sampled)
worktop x 197,345 ops/sec Β±2.40% (88 runs sampled)
Fastest is Hono
β¨ Done in 28.06s.
```
See [more benchmarks](/docs/concepts/benchmarks).
## Lightweight
**Hono is so small**. With the `hono/tiny` preset, its size is **under 14KB** when minified. There are many middleware and adapters, but they are bundled only when used. For context, the size of Express is 572KB.
```
$ npx wrangler dev --minify ./src/index.ts
β οΈ wrangler 2.20.0
--------------------
⬣ Listening at http://0.0.0.0:8787
- http://127.0.0.1:8787
- http://192.168.128.165:8787
Total Upload: 11.47 KiB / gzip: 4.34 KiB
```
## Multiple routers
**Hono has multiple routers**.
**RegExpRouter** is the fastest router in the JavaScript world. It matches the route using a single large Regex created before dispatch. With **SmartRouter**, it supports all route patterns.
**LinearRouter** registers the routes very quickly, so it's suitable for an environment that initializes applications every time. **PatternRouter** simply adds and matches the pattern, making it small.
See [more information about routes](/docs/concepts/routers).
## Web Standards
Thanks to the use of the **Web Standards**, Hono works on a lot of platforms.
- Cloudflare Workers
- Cloudflare Pages
- Fastly Compute
- Deno
- Bun
- Vercel
- AWS Lambda
- Lambda@Edge
- Others
And by using [a Node.js adapter](https://github.com/honojs/node-server), Hono works on Node.js.
See [more information about Web Standards](/docs/concepts/web-standard).
## Middleware & Helpers
**Hono has many middleware and helpers**. This makes "Write Less, do more" a reality.
Out of the box, Hono provides middleware and helpers for:
- [Basic Authentication](/docs/middleware/builtin/basic-auth)
- [Bearer Authentication](/docs/middleware/builtin/bearer-auth)
- [Body Limit](/docs/middleware/builtin/body-limit)
- [Cache](/docs/middleware/builtin/cache)
- [Compress](/docs/middleware/builtin/compress)
- [Context Storage](/docs/middleware/builtin/context-storage)
- [Cookie](/docs/helpers/cookie)
- [CORS](/docs/middleware/builtin/cors)
- [ETag](/docs/middleware/builtin/etag)
- [html](/docs/helpers/html)
- [JSX](/docs/guides/jsx)
- [JWT Authentication](/docs/middleware/builtin/jwt)
- [Logger](/docs/middleware/builtin/logger)
- [Language](/docs/middleware/builtin/language)
- [Pretty JSON](/docs/middleware/builtin/pretty-json)
- [Secure Headers](/docs/middleware/builtin/secure-headers)
- [SSG](/docs/helpers/ssg)
- [Streaming](/docs/helpers/streaming)
- [GraphQL Server](https://github.com/honojs/middleware/tree/main/packages/graphql-server)
- [Firebase Authentication](https://github.com/honojs/middleware/tree/main/packages/firebase-auth)
- [Sentry](https://github.com/honojs/middleware/tree/main/packages/sentry)
- Others!
For example, adding ETag and request logging only takes a few lines of code with Hono:
```ts
import { Hono } from 'hono'
import { etag } from 'hono/etag'
import { logger } from 'hono/logger'
const app = new Hono()
app.use(etag(), logger())
```
See [more information about Middleware](/docs/concepts/middleware).
## Developer Experience
Hono provides a delightful "**Developer Experience**".
Easy access to Request/Response thanks to the `Context` object.
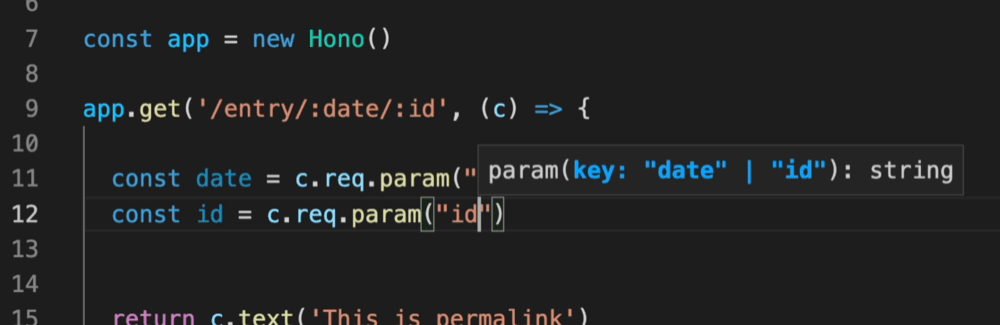
Moreover, Hono is written in TypeScript. Hono has "**Types**".
For example, the path parameters will be literal types.

And, the Validator and Hono Client `hc` enable the RPC mode. In RPC mode,
you can use your favorite validator such as Zod and easily share server-side API specs with the client and build type-safe applications.
See [Hono Stacks](/docs/concepts/stacks).
# Examples
See the [Examples section](/examples/).
# Helpers
Helpers are available to assist in developing your application. Unlike middleware, they don't act as handlers, but rather provide useful functions.
For instance, here's how to use the [Cookie helper](/docs/helpers/cookie):
```ts
import { getCookie, setCookie } from 'hono/cookie'
const app = new Hono()
app.get('/cookie', (c) => {
const yummyCookie = getCookie(c, 'yummy_cookie')
// ...
setCookie(c, 'delicious_cookie', 'macha')
//
})
```
## Available Helpers
- [Accepts](/docs/helpers/accepts)
- [Adapter](/docs/helpers/adapter)
- [Cookie](/docs/helpers/cookie)
- [css](/docs/helpers/css)
- [Dev](/docs/helpers/dev)
- [Factory](/docs/helpers/factory)
- [html](/docs/helpers/html)
- [JWT](/docs/helpers/jwt)
- [SSG](/docs/helpers/ssg)
- [Streaming](/docs/helpers/streaming)
- [Testing](/docs/helpers/testing)
- [WebSocket](/docs/helpers/websocket)
# Testing
[Vitest]: https://vitest.dev/
Testing is important.
In actuality, it is easy to test Hono's applications.
The way to create a test environment differs from each runtime, but the basic steps are the same.
In this section, let's test with Cloudflare Workers and [Vitest].
::: tip
Cloudflare recommends using [Vitest] with [@cloudflare/vitest-pool-workers](https://www.npmjs.com/package/@cloudflare/vitest-pool-workers). For more details, please refer to [Vitest integration](https://developers.cloudflare.com/workers/testing/vitest-integration/) in the Cloudflare Workers docs.
:::
## Request and Response
All you need to do is create a Request and pass it to the Hono application to validate the Response. You can then use the useful `app.request` method.
::: tip
For a typed test client see the [testing helper](/docs/helpers/testing).
:::
For example, consider an application that provides the following REST API.
```ts
app.get('/posts', (c) => {
return c.text('Many posts')
})
app.post('/posts', (c) => {
return c.json(
{
message: 'Created',
},
201,
{
'X-Custom': 'Thank you',
}
)
})
```
Make a request to `GET /posts` and test the response.
```ts
describe('Example', () => {
test('GET /posts', async () => {
const res = await app.request('/posts')
expect(res.status).toBe(200)
expect(await res.text()).toBe('Many posts')
})
})
```
To make a request to `POST /posts`, do the following.
```ts
test('POST /posts', async () => {
const res = await app.request('/posts', {
method: 'POST',
})
expect(res.status).toBe(201)
expect(res.headers.get('X-Custom')).toBe('Thank you')
expect(await res.json()).toEqual({
message: 'Created',
})
})
```
To make a request to `POST /posts` with `JSON` data, do the following.
```ts
test('POST /posts', async () => {
const res = await app.request('/posts', {
method: 'POST',
body: JSON.stringify({ message: 'hello hono' }),
headers: new Headers({ 'Content-Type': 'application/json' }),
})
expect(res.status).toBe(201)
expect(res.headers.get('X-Custom')).toBe('Thank you')
expect(await res.json()).toEqual({
message: 'Created',
})
})
```
To make a request to `POST /posts` with `multipart/form-data` data, do the following.
```ts
test('POST /posts', async () => {
const formData = new FormData()
formData.append('message', 'hello')
const res = await app.request('/posts', {
method: 'POST',
body: formData,
})
expect(res.status).toBe(201)
expect(res.headers.get('X-Custom')).toBe('Thank you')
expect(await res.json()).toEqual({
message: 'Created',
})
})
```
You can also pass an instance of the Request class.
```ts
test('POST /posts', async () => {
const req = new Request('http://localhost/posts', {
method: 'POST',
})
const res = await app.request(req)
expect(res.status).toBe(201)
expect(res.headers.get('X-Custom')).toBe('Thank you')
expect(await res.json()).toEqual({
message: 'Created',
})
})
```
In this way, you can test it as like an End-to-End.
## Env
To set `c.env` for testing, you can pass it as the 3rd parameter to `app.request`. This is useful for mocking values like [Cloudflare Workers Bindings](https://hono.dev/getting-started/cloudflare-workers#bindings):
```ts
const MOCK_ENV = {
API_HOST: 'example.com',
DB: {
prepare: () => {
/* mocked D1 */
},
},
}
test('GET /posts', async () => {
const res = await app.request('/posts', {}, MOCK_ENV)
})
```
# Best Practices
Hono is very flexible. You can write your app as you like.
However, there are best practices that are better to follow.
## Don't make "Controllers" when possible
When possible, you should not create "Ruby on Rails-like Controllers".
```ts
// π
// A RoR-like Controller
const booksList = (c: Context) => {
return c.json('list books')
}
app.get('/books', booksList)
```
The issue is related to types. For example, the path parameter cannot be inferred in the Controller without writing complex generics.
```ts
// π
// A RoR-like Controller
const bookPermalink = (c: Context) => {
const id = c.req.param('id') // Can't infer the path param
return c.json(`get ${id}`)
}
```
Therefore, you don't need to create RoR-like controllers and should write handlers directly after path definitions.
```ts
// π
app.get('/books/:id', (c) => {
const id = c.req.param('id') // Can infer the path param
return c.json(`get ${id}`)
})
```
## `factory.createHandlers()` in `hono/factory`
If you still want to create a RoR-like Controller, use `factory.createHandlers()` in [`hono/factory`](/docs/helpers/factory). If you use this, type inference will work correctly.
```ts
import { createFactory } from 'hono/factory'
import { logger } from 'hono/logger'
// ...
// π
const factory = createFactory()
const middleware = factory.createMiddleware(async (c, next) => {
c.set('foo', 'bar')
await next()
})
const handlers = factory.createHandlers(logger(), middleware, (c) => {
return c.json(c.var.foo)
})
app.get('/api', ...handlers)
```
## Building a larger application
Use `app.route()` to build a larger application without creating "Ruby on Rails-like Controllers".
If your application has `/authors` and `/books` endpoints and you wish to separate files from `index.ts`, create `authors.ts` and `books.ts`.
```ts
// authors.ts
import { Hono } from 'hono'
const app = new Hono()
app.get('/', (c) => c.json('list authors'))
app.post('/', (c) => c.json('create an author', 201))
app.get('/:id', (c) => c.json(`get ${c.req.param('id')}`))
export default app
```
```ts
// books.ts
import { Hono } from 'hono'
const app = new Hono()
app.get('/', (c) => c.json('list books'))
app.post('/', (c) => c.json('create a book', 201))
app.get('/:id', (c) => c.json(`get ${c.req.param('id')}`))
export default app
```
Then, import them and mount on the paths `/authors` and `/books` with `app.route()`.
```ts
// index.ts
import { Hono } from 'hono'
import authors from './authors'
import books from './books'
const app = new Hono()
// π
app.route('/authors', authors)
app.route('/books', books)
export default app
```
### If you want to use RPC features
The code above works well for normal use cases.
However, if you want to use the `RPC` feature, you can get the correct type by chaining as follows.
```ts
// authors.ts
import { Hono } from 'hono'
const app = new Hono()
.get('/', (c) => c.json('list authors'))
.post('/', (c) => c.json('create an author', 201))
.get('/:id', (c) => c.json(`get ${c.req.param('id')}`))
export default app
export type AppType = typeof app
```
If you pass the type of the `app` to `hc`, it will get the correct type.
```ts
import type { AppType } from './authors'
import { hc } from 'hono/client'
// π
const client = hc('http://localhost') // Typed correctly
```
For more detailed information, please see [the RPC page](/docs/guides/rpc#using-rpc-with-larger-applications).
## HEAD Request Best Practices
### Understanding Hono's HEAD Handling
Hono automatically handles HEAD requests by converting them to GET requests and stripping the response body. This behavior is built into the framework's dispatch layer and happens before route matching occurs.
### β Do: Use GET Routes for HEAD Requests
```typescript
// GOOD: This GET route automatically handles HEAD requests
app.get('/api/users', async (c) => {
const users = await getUsers()
c.header('X-Total-Count', users.length.toString())
return c.json(users)
})
// HEAD /api/users will return:
// - Same headers as GET (including X-Total-Count)
// - Status 200
// - No body (null)
```
### β Do: Use Middleware for HEAD-Specific Logic
```typescript
// GOOD: Use middleware when HEAD needs different behavior
app.use('/api/resource', async (c, next) => {
await next()
// Add HEAD-specific headers after the handler
if (c.req.method === 'HEAD') {
c.header('X-HEAD-Processed', 'true')
// Don't compute expensive body content for HEAD
c.res = new Response(null, c.res)
}
})
```
### β Don't: Try to Create Dedicated HEAD Handlers
```typescript
// BAD: This won't work as expected
app.head('/api/users', (c) => {
// This handler will NEVER be called
c.header('X-Custom', 'value')
return c.text('ignored')
})
// BAD: Using on() also won't work
app.on('HEAD', '/api/users', (c) => {
// Still converted to GET before route matching
})
```
### Performance Considerations
- **Avoid expensive operations in GET handlers if you expect many HEAD requests**: Use middleware to detect HEAD and skip body generation
- **Cache headers work identically**: HEAD responses respect the same caching rules as GET
- **Middleware compatibility**: Most middleware works with HEAD, but body-processing middleware (like compression) automatically skips HEAD requests
### Testing HEAD Requests
```typescript
// Always test both GET and HEAD responses
it('handles HEAD requests correctly', async () => {
const getRes = await app.request('/api/users')
const headRes = await app.request('/api/users', { method: 'HEAD' })
expect(headRes.status).toBe(getRes.status)
expect(headRes.headers.get('X-Total-Count')).toBe(
getRes.headers.get('X-Total-Count')
)
expect(headRes.body).toBe(null)
})
```
### Notes
- The automatic HEAD conversion ensures consistent headers between GET and HEAD responses
- This behavior is consistent across all Hono runtimes (Cloudflare Workers, Deno, Bun, Node.js)
- If you need completely different logic for HEAD vs GET, consider using different endpoints rather than trying to override the framework's HEAD handling
# Client Components
`hono/jsx` supports not only server side but also client side. This means that it is possible to create an interactive UI that runs in the browser. We call it Client Components or `hono/jsx/dom`.
It is fast and very small. The counter program in `hono/jsx/dom` is only 2.8KB with Brotli compression, but 47.8KB for React.
This section introduces Client Components-specific features.
## Counter example
Here is an example of a simple counter, the same code works as in React.
```tsx
import { useState } from 'hono/jsx'
import { render } from 'hono/jsx/dom'
function Counter() {
const [count, setCount] = useState(0)
return (
Count: {count}
)
}
function App() {
return (
)
}
const root = document.getElementById('root')
render(, root)
```
## `render()`
You can use `render()` to insert JSX components within a specified HTML element.
```tsx
render(, container)
```
You can see full example code here: [Counter example](https://github.com/honojs/examples/tree/main/hono-vite-jsx).
## Hooks compatible with React
hono/jsx/dom has Hooks that are compatible or partially compatible with React. You can learn about these APIs by looking at [the React documentation](https://react.dev/reference/react/hooks).
- `useState()`
- `useEffect()`
- `useRef()`
- `useCallback()`
- `use()`
- `startTransition()`
- `useTransition()`
- `useDeferredValue()`
- `useMemo()`
- `useLayoutEffect()`
- `useReducer()`
- `useDebugValue()`
- `createElement()`
- `memo()`
- `isValidElement()`
- `useId()`
- `createRef()`
- `forwardRef()`
- `useImperativeHandle()`
- `useSyncExternalStore()`
- `useInsertionEffect()`
- `useFormStatus()`
- `useActionState()`
- `useOptimistic()`
## `startViewTransition()` family
The `startViewTransition()` family contains original hooks and functions to handle [View Transitions API](https://developer.mozilla.org/en-US/docs/Web/API/View_Transitions_API) easily. The examples below demonstrate how to use them.
### 1. A very simple example
You can write a transition using the `document.startViewTransition` shortly with the `startViewTransition()`.
```tsx
import { useState, startViewTransition } from 'hono/jsx'
import { css, Style } from 'hono/css'
export default function App() {
const [showLargeImage, setShowLargeImage] = useState(false)
return (
<>
{!showLargeImage ? (
) : (
)}
>
)
}
```
### 2. Using `viewTransition()` with `keyframes()`
The `viewTransition()` function allows you to get the unique `view-transition-name`.
You can use it with the `keyframes()`, The `::view-transition-old()` is converted to `::view-transition-old(${uniqueName))`.
```tsx
import { useState, startViewTransition } from 'hono/jsx'
import { viewTransition } from 'hono/jsx/dom/css'
import { css, keyframes, Style } from 'hono/css'
const rotate = keyframes`
from {
rotate: 0deg;
}
to {
rotate: 360deg;
}
`
export default function App() {
const [showLargeImage, setShowLargeImage] = useState(false)
const [transitionNameClass] = useState(() =>
viewTransition(css`
::view-transition-old() {
animation-name: ${rotate};
}
::view-transition-new() {
animation-name: ${rotate};
}
`)
)
return (
<>
{!showLargeImage ? (
) : (
)}
>
)
}
```
### 3. Using `useViewTransition`
If you want to change the style only during the animation. You can use `useViewTransition()`. This hook returns the `[boolean, (callback: () => void) => void]`, and they are the `isUpdating` flag and the `startViewTransition()` function.
When this hook is used, the Component is evaluated at the following two times.
- Inside the callback of a call to `startViewTransition()`.
- When [the `finish` promise becomes fulfilled](https://developer.mozilla.org/en-US/docs/Web/API/ViewTransition/finished)
```tsx
import { useState, useViewTransition } from 'hono/jsx'
import { viewTransition } from 'hono/jsx/dom/css'
import { css, keyframes, Style } from 'hono/css'
const rotate = keyframes`
from {
rotate: 0deg;
}
to {
rotate: 360deg;
}
`
export default function App() {
const [isUpdating, startViewTransition] = useViewTransition()
const [showLargeImage, setShowLargeImage] = useState(false)
const [transitionNameClass] = useState(() =>
viewTransition(css`
::view-transition-old() {
animation-name: ${rotate};
}
::view-transition-new() {
animation-name: ${rotate};
}
`)
)
return (
<>
{!showLargeImage ? (
) : (
)}
>
)
}
```
## The `hono/jsx/dom` runtime
There is a small JSX Runtime for Client Components. Using this will result in smaller bundled results than using `hono/jsx`. Specify `hono/jsx/dom` in `tsconfig.json`. For Deno, modify the deno.json.
```json
{
"compilerOptions": {
"jsx": "react-jsx",
"jsxImportSource": "hono/jsx/dom"
}
}
```
Alternatively, you can specify `hono/jsx/dom` in the esbuild transform options in `vite.config.ts`.
```ts
import { defineConfig } from 'vite'
export default defineConfig({
esbuild: {
jsxImportSource: 'hono/jsx/dom',
},
})
```
# Frequently Asked Questions
This guide is a collection of frequently asked questions (FAQ) about Hono and how to resolve them.
## Is there an official Renovate config for Hono?
The Hono team does not currently maintain [Renovate](https://github.com/renovatebot/renovate) Configuration.
Therefore, please use third-party renovate-config as follows.
In your `renovate.json` :
```json
// renovate.json
{
"$schema": "https://docs.renovatebot.com/renovate-schema.json",
"extends": [
"github>shinGangan/renovate-config-hono" // [!code ++]
]
}
```
see [renovate-config-hono](https://github.com/shinGangan/renovate-config-hono) repository for more details.
# Validation
Hono provides only a very thin Validator.
However, it can be powerful when combined with a third-party Validator.
In addition, the RPC feature allows you to share API specifications with your clients through types.
## Manual validator
First, introduce a way to validate incoming values without using the third-party Validator.
Import `validator` from `hono/validator`.
```ts
import { validator } from 'hono/validator'
```
To validate form data, specify `form` as the first argument and a callback as the second argument.
In the callback, validates the value and return the validated values at the end.
The `validator` can be used as middleware.
```ts
app.post(
'/posts',
validator('form', (value, c) => {
const body = value['body']
if (!body || typeof body !== 'string') {
return c.text('Invalid!', 400)
}
return {
body: body,
}
}),
//...
```
Within the handler, you can get the validated value with `c.req.valid('form')`.
```ts
, (c) => {
const { body } = c.req.valid('form')
// ... do something
return c.json(
{
message: 'Created!',
},
201
)
}
```
Validation targets include `json`, `query`, `header`, `param` and `cookie` in addition to `form`.
::: warning
When you validate `json` or `form`, the request _must_ contain a matching `content-type` header (e.g. `Content-Type: application/json` for `json`). Otherwise, the request body will not be parsed and you will receive an empty object (`{}`) as value in the callback.
It is important to set the `content-type` header when testing using
[`app.request()`](../api/request.md).
Given an application like this.
```ts
const app = new Hono()
app.post(
'/testing',
validator('json', (value, c) => {
// pass-through validator
return value
}),
(c) => {
const body = c.req.valid('json')
return c.json(body)
}
)
```
Your tests can be written like this.
```ts
// β this will not work
const res = await app.request('/testing', {
method: 'POST',
body: JSON.stringify({ key: 'value' }),
})
const data = await res.json()
console.log(data) // {}
// β this will work
const res = await app.request('/testing', {
method: 'POST',
body: JSON.stringify({ key: 'value' }),
headers: new Headers({ 'Content-Type': 'application/json' }),
})
const data = await res.json()
console.log(data) // { key: 'value' }
```
:::
::: warning
When you validate `header`, you need to use **lowercase** name as the key.
If you want to validate the `Idempotency-Key` header, you need to use `idempotency-key` as the key.
```ts
// β this will not work
app.post(
'/api',
validator('header', (value, c) => {
// idempotencyKey is always undefined
// so this middleware always return 400 as not expected
const idempotencyKey = value['Idempotency-Key']
if (idempotencyKey == undefined || idempotencyKey === '') {
throw new HTTPException(400, {
message: 'Idempotency-Key is required',
})
}
return { idempotencyKey }
}),
(c) => {
const { idempotencyKey } = c.req.valid('header')
// ...
}
)
// β this will work
app.post(
'/api',
validator('header', (value, c) => {
// can retrieve the value of the header as expected
const idempotencyKey = value['idempotency-key']
if (idempotencyKey == undefined || idempotencyKey === '') {
throw new HTTPException(400, {
message: 'Idempotency-Key is required',
})
}
return { idempotencyKey }
}),
(c) => {
const { idempotencyKey } = c.req.valid('header')
// ...
}
)
```
:::
## Multiple validators
You can also include multiple validators to validate different parts of request:
```ts
app.post(
'/posts/:id',
validator('param', ...),
validator('query', ...),
validator('json', ...),
(c) => {
//...
}
```
## With Zod
You can use [Zod](https://zod.dev), one of third-party validators.
We recommend using a third-party validator.
Install from the Npm registry.
::: code-group
```sh [npm]
npm i zod
```
```sh [yarn]
yarn add zod
```
```sh [pnpm]
pnpm add zod
```
```sh [bun]
bun add zod
```
:::
Import `z` from `zod`.
```ts
import * as z from 'zod'
```
Write your schema.
```ts
const schema = z.object({
body: z.string(),
})
```
You can use the schema in the callback function for validation and return the validated value.
```ts
const route = app.post(
'/posts',
validator('form', (value, c) => {
const parsed = schema.safeParse(value)
if (!parsed.success) {
return c.text('Invalid!', 401)
}
return parsed.data
}),
(c) => {
const { body } = c.req.valid('form')
// ... do something
return c.json(
{
message: 'Created!',
},
201
)
}
)
```
## Zod Validator Middleware
You can use the [Zod Validator Middleware](https://github.com/honojs/middleware/tree/main/packages/zod-validator) to make it even easier.
::: code-group
```sh [npm]
npm i @hono/zod-validator
```
```sh [yarn]
yarn add @hono/zod-validator
```
```sh [pnpm]
pnpm add @hono/zod-validator
```
```sh [bun]
bun add @hono/zod-validator
```
:::
And import `zValidator`.
```ts
import { zValidator } from '@hono/zod-validator'
```
And write as follows.
```ts
const route = app.post(
'/posts',
zValidator(
'form',
z.object({
body: z.string(),
})
),
(c) => {
const validated = c.req.valid('form')
// ... use your validated data
}
)
```
## Standard Schema Validator Middleware
[Standard Schema](https://standardschema.dev/) is a specification that provides a common interface for TypeScript validation libraries. It was created by the maintainers of Zod, Valibot, and ArkType to allow ecosystem tools to work with any validation library without needing custom adapters.
The [Standard Schema Validator Middleware](https://github.com/honojs/middleware/tree/main/packages/standard-validator) lets you use any Standard Schema-compatible validation library with Hono, giving you the flexibility to choose your preferred validator while maintaining consistent type safety.
::: code-group
```sh [npm]
npm i @hono/standard-validator
```
```sh [yarn]
yarn add @hono/standard-validator
```
```sh [pnpm]
pnpm add @hono/standard-validator
```
```sh [bun]
bun add @hono/standard-validator
```
:::
Import `sValidator` from the package:
```ts
import { sValidator } from '@hono/standard-validator'
```
### With Zod
You can use Zod with the Standard Schema validator:
::: code-group
```sh [npm]
npm i zod
```
```sh [yarn]
yarn add zod
```
```sh [pnpm]
pnpm add zod
```
```sh [bun]
bun add zod
```
:::
```ts
import * as z from 'zod'
import { sValidator } from '@hono/standard-validator'
const schema = z.object({
name: z.string(),
age: z.number(),
})
app.post('/author', sValidator('json', schema), (c) => {
const data = c.req.valid('json')
return c.json({
success: true,
message: `${data.name} is ${data.age}`,
})
})
```
### With Valibot
[Valibot](https://valibot.dev/) is a lightweight alternative to Zod with a modular design:
::: code-group
```sh [npm]
npm i valibot
```
```sh [yarn]
yarn add valibot
```
```sh [pnpm]
pnpm add valibot
```
```sh [bun]
bun add valibot
```
:::
```ts
import * as v from 'valibot'
import { sValidator } from '@hono/standard-validator'
const schema = v.object({
name: v.string(),
age: v.number(),
})
app.post('/author', sValidator('json', schema), (c) => {
const data = c.req.valid('json')
return c.json({
success: true,
message: `${data.name} is ${data.age}`,
})
})
```
### With ArkType
[ArkType](https://arktype.io/) offers TypeScript-native syntax for runtime validation:
::: code-group
```sh [npm]
npm i arktype
```
```sh [yarn]
yarn add arktype
```
```sh [pnpm]
pnpm add arktype
```
```sh [bun]
bun add arktype
```
:::
```ts
import { type } from 'arktype'
import { sValidator } from '@hono/standard-validator'
const schema = type({
name: 'string',
age: 'number',
})
app.post('/author', sValidator('json', schema), (c) => {
const data = c.req.valid('json')
return c.json({
success: true,
message: `${data.name} is ${data.age}`,
})
})
```
# JSX
You can write HTML with JSX syntax with `hono/jsx`.
Although `hono/jsx` works on the client, you will probably use it most often when rendering content on the server side. Here are some things related to JSX that are common to both server and client.
## Settings
To use JSX, modify the `tsconfig.json`:
`tsconfig.json`:
```json
{
"compilerOptions": {
"jsx": "react-jsx",
"jsxImportSource": "hono/jsx"
}
}
```
Alternatively, use the pragma directives:
```ts
/** @jsx jsx */
/** @jsxImportSource hono/jsx */
```
For Deno, you have to modify the `deno.json` instead of the `tsconfig.json`:
```json
{
"compilerOptions": {
"jsx": "precompile",
"jsxImportSource": "@hono/hono/jsx"
}
}
```
## Usage
:::info
If you are coming straight from the [Quick Start](/docs/#quick-start), the main file has a `.ts` extension - you need to change it to `.tsx` - otherwise you will not be able to run the application at all. You should additionally modify the `package.json` (or `deno.json` if you are using Deno) to reflect that change (e.g. instead of having `bun run --hot src/index.ts` in dev script, you should have `bun run --hot src/index.tsx`).
:::
`index.tsx`:
```tsx
import { Hono } from 'hono'
import type { FC } from 'hono/jsx'
const app = new Hono()
const Layout: FC = (props) => {
return (
{props.children}
)
}
const Top: FC<{ messages: string[] }> = (props: {
messages: string[]
}) => {
return (
Hello Hono!
{props.messages.map((message) => {
return
{message}!!
})}
)
}
app.get('/', (c) => {
const messages = ['Good Morning', 'Good Evening', 'Good Night']
return c.html()
})
export default app
```
## Metadata hoisting
You can write document metadata tags such as ``, ``, and `` directly inside your components. These tags will be automatically hoisted to the `` section of the document. This is especially useful when the `` element is rendered far from the component that determines the appropriate metadata.
```tsx
import { Hono } from 'hono'
const app = new Hono()
app.use('*', async (c, next) => {
c.setRenderer((content) => {
return c.html(
{content}
)
})
await next()
})
app.get('/about', (c) => {
return c.render(
<>
About Page
about page content
>
)
})
export default app
```
:::info
When hoisting occurs, existing elements are not removed. Elements appearing later are added to the end. For example, if you have `Default` in your `` and a component renders `Page Title`, both titles will appear in the head.
:::
## Fragment
Use Fragment to group multiple elements without adding extra nodes:
```tsx
import { Fragment } from 'hono/jsx'
const List = () => (
first child
second child
third child
)
```
Or you can write it with `<>>` if it sets up properly.
```tsx
const List = () => (
<>
first child
second child
third child
>
)
```
## `PropsWithChildren`
You can use `PropsWithChildren` to correctly infer a child element in a function component.
```tsx
import { PropsWithChildren } from 'hono/jsx'
type Post = {
id: number
title: string
}
function Component({ title, children }: PropsWithChildren) {
return (
{title}
{children}
)
}
```
## Inserting Raw HTML
To directly insert HTML, use `dangerouslySetInnerHTML`:
```tsx
app.get('/foo', (c) => {
const inner = { __html: 'JSX · SSR' }
const Div =
})
```
## Memoization
Optimize your components by memoizing computed strings using `memo`:
```tsx
import { memo } from 'hono/jsx'
const Header = memo(() => Welcome to Hono)
const Footer = memo(() => )
const Layout = (
Hono is cool!
)
```
## Context
By using `useContext`, you can share data globally across any level of the Component tree without passing values through props.
```tsx
import type { FC } from 'hono/jsx'
import { createContext, useContext } from 'hono/jsx'
const themes = {
light: {
color: '#000000',
background: '#eeeeee',
},
dark: {
color: '#ffffff',
background: '#222222',
},
}
const ThemeContext = createContext(themes.light)
const Button: FC = () => {
const theme = useContext(ThemeContext)
return
}
const Toolbar: FC = () => {
return (
)
}
// ...
app.get('/', (c) => {
return c.html(
)
})
```
## Async Component
`hono/jsx` supports an Async Component, so you can use `async`/`await` in your component.
If you render it with `c.html()`, it will await automatically.
```tsx
const AsyncComponent = async () => {
await new Promise((r) => setTimeout(r, 1000)) // sleep 1s
return
Done!
}
app.get('/', (c) => {
return c.html(
)
})
```
## Suspense
The React-like `Suspense` feature is available.
If you wrap the async component with `Suspense`, the content in the fallback will be rendered first, and once the Promise is resolved, the awaited content will be displayed.
You can use it with `renderToReadableStream()`.
```tsx
import { renderToReadableStream, Suspense } from 'hono/jsx/streaming'
//...
app.get('/', (c) => {
const stream = renderToReadableStream(
loading...}>
)
return c.body(stream, {
headers: {
'Content-Type': 'text/html; charset=UTF-8',
'Transfer-Encoding': 'chunked',
},
})
})
```
## ErrorBoundary
You can catch errors in child components using `ErrorBoundary`.
In the example below, it will show the content specified in `fallback` if an error occurs.
```tsx
function SyncComponent() {
throw new Error('Error')
return
Hello
}
app.get('/sync', async (c) => {
return c.html(
Out of Service}>
)
})
```
`ErrorBoundary` can also be used with async components and `Suspense`.
```tsx
async function AsyncComponent() {
await new Promise((resolve) => setTimeout(resolve, 2000))
throw new Error('Error')
return
Hello
}
app.get('/with-suspense', async (c) => {
return c.html(
Out of Service}>
Loading...}>
)
})
```
## StreamingContext
You can use `StreamingContext` to provide configuration for streaming components like `Suspense` and `ErrorBoundary`. This is useful for adding nonce values to script tags generated by these components for Content Security Policy (CSP).
```tsx
import { Suspense, StreamingContext } from 'hono/jsx/streaming'
// ...
app.get('/', (c) => {
const stream = renderToReadableStream(
Loading...}>
)
return c.body(stream, {
headers: {
'Content-Type': 'text/html; charset=UTF-8',
'Transfer-Encoding': 'chunked',
'Content-Security-Policy':
"script-src 'nonce-random-nonce-value'",
},
})
})
```
The `scriptNonce` value will be automatically added to any `
) : (
)}
Hello
)
})
```
In order to build the script properly, you can use the example config file `vite.config.ts` as shown below.
```ts
import pages from '@hono/vite-cloudflare-pages'
import devServer from '@hono/vite-dev-server'
import { defineConfig } from 'vite'
export default defineConfig(({ mode }) => {
if (mode === 'client') {
return {
build: {
rollupOptions: {
input: './src/client.ts',
output: {
entryFileNames: 'static/client.js',
},
},
},
}
} else {
return {
plugins: [
pages(),
devServer({
entry: 'src/index.tsx',
}),
],
}
}
})
```
You can run the following command to build the server and client script.
```sh
vite build --mode client && vite build
```
## Cloudflare Pages Middleware
Cloudflare Pages uses its own [middleware](https://developers.cloudflare.com/pages/functions/middleware/) system that is different from Hono's middleware. You can enable it by exporting `onRequest` in a file named `_middleware.ts` like this:
```ts
// functions/_middleware.ts
export async function onRequest(pagesContext) {
console.log(`You are accessing ${pagesContext.request.url}`)
return await pagesContext.next()
}
```
Using `handleMiddleware`, you can use Hono's middleware as Cloudflare Pages middleware.
```ts
// functions/_middleware.ts
import { handleMiddleware } from 'hono/cloudflare-pages'
export const onRequest = handleMiddleware(async (c, next) => {
console.log(`You are accessing ${c.req.url}`)
await next()
})
```
You can also use built-in and 3rd party middleware for Hono. For example, to add Basic Authentication, you can use [Hono's Basic Authentication Middleware](/docs/middleware/builtin/basic-auth).
```ts
// functions/_middleware.ts
import { handleMiddleware } from 'hono/cloudflare-pages'
import { basicAuth } from 'hono/basic-auth'
export const onRequest = handleMiddleware(
basicAuth({
username: 'hono',
password: 'acoolproject',
})
)
```
If you want to apply multiple middleware, you can write it like this:
```ts
import { handleMiddleware } from 'hono/cloudflare-pages'
// ...
export const onRequest = [
handleMiddleware(middleware1),
handleMiddleware(middleware2),
handleMiddleware(middleware3),
]
```
### Accessing `EventContext`
You can access [`EventContext`](https://developers.cloudflare.com/pages/functions/api-reference/#eventcontext) object via `c.env` in `handleMiddleware`.
```ts
// functions/_middleware.ts
import { handleMiddleware } from 'hono/cloudflare-pages'
export const onRequest = [
handleMiddleware(async (c, next) => {
c.env.eventContext.data.user = 'Joe'
await next()
}),
]
```
Then, you can access the data value in via `c.env.eventContext` in the handler:
```ts
// functions/api/[[route]].ts
import type { EventContext } from 'hono/cloudflare-pages'
import { handle } from 'hono/cloudflare-pages'
// ...
type Env = {
Bindings: {
eventContext: EventContext
}
}
const app = new Hono().basePath('/api')
app.get('/hello', (c) => {
return c.json({
message: `Hello, ${c.env.eventContext.data.user}!`, // 'Joe'
})
})
export const onRequest = handle(app)
```
# AWS Lambda
AWS Lambda is a serverless platform by Amazon Web Services.
You can run your code in response to events and automatically manages the underlying compute resources for you.
Hono works on AWS Lambda with the Node.js 18+ environment.
## 1. Setup
When creating the application on AWS Lambda,
[CDK](https://docs.aws.amazon.com/cdk/v2/guide/home.html)
is useful to set up the functions such as IAM Role, API Gateway, and others.
Initialize your project with the `cdk` CLI.
::: code-group
```sh [npm]
mkdir my-app
cd my-app
cdk init app -l typescript
npm i hono
npm i -D esbuild
mkdir lambda
touch lambda/index.ts
```
```sh [yarn]
mkdir my-app
cd my-app
cdk init app -l typescript
yarn add hono
yarn add -D esbuild
mkdir lambda
touch lambda/index.ts
```
```sh [pnpm]
mkdir my-app
cd my-app
cdk init app -l typescript
pnpm add hono
pnpm add -D esbuild
mkdir lambda
touch lambda/index.ts
```
```sh [bun]
mkdir my-app
cd my-app
cdk init app -l typescript
bun add hono
bun add -D esbuild
mkdir lambda
touch lambda/index.ts
```
:::
## 2. Hello World
Edit `lambda/index.ts`.
```ts
import { Hono } from 'hono'
import { handle } from 'hono/aws-lambda'
const app = new Hono()
app.get('/', (c) => c.text('Hello Hono!'))
export const handler = handle(app)
```
## 3. Deploy
Edit `lib/my-app-stack.ts`.
```ts
import * as cdk from 'aws-cdk-lib'
import { Construct } from 'constructs'
import * as lambda from 'aws-cdk-lib/aws-lambda'
import { NodejsFunction } from 'aws-cdk-lib/aws-lambda-nodejs'
export class MyAppStack extends cdk.Stack {
constructor(scope: Construct, id: string, props?: cdk.StackProps) {
super(scope, id, props)
const fn = new NodejsFunction(this, 'lambda', {
entry: 'lambda/index.ts',
handler: 'handler',
runtime: lambda.Runtime.NODEJS_22_X,
})
const fnUrl = fn.addFunctionUrl({
authType: lambda.FunctionUrlAuthType.NONE,
})
new cdk.CfnOutput(this, 'lambdaUrl', {
value: fnUrl.url!,
})
}
}
```
Finally, run the command to deploy:
```sh
cdk deploy
```
## Serve Binary data
Hono supports binary data as a response.
In Lambda, base64 encoding is required to return binary data.
Once binary type is set to `Content-Type` header, Hono automatically encodes data to base64.
```ts
app.get('/binary', async (c) => {
// ...
c.status(200)
c.header('Content-Type', 'image/png') // means binary data
return c.body(buffer) // supports `ArrayBufferLike` type, encoded to base64.
})
```
## Access AWS Lambda Object
In Hono, you can access the AWS Lambda Events and Context by binding the `LambdaEvent`, `LambdaContext` type and using `c.env`
```ts
import { Hono } from 'hono'
import type { LambdaEvent, LambdaContext } from 'hono/aws-lambda'
import { handle } from 'hono/aws-lambda'
type Bindings = {
event: LambdaEvent
lambdaContext: LambdaContext
}
const app = new Hono<{ Bindings: Bindings }>()
app.get('/aws-lambda-info/', (c) => {
return c.json({
isBase64Encoded: c.env.event.isBase64Encoded,
awsRequestId: c.env.lambdaContext.awsRequestId,
})
})
export const handler = handle(app)
```
## Access RequestContext
In Hono, you can access the AWS Lambda request context by binding the `LambdaEvent` type and using `c.env.event.requestContext`.
```ts
import { Hono } from 'hono'
import type { LambdaEvent } from 'hono/aws-lambda'
import { handle } from 'hono/aws-lambda'
type Bindings = {
event: LambdaEvent
}
const app = new Hono<{ Bindings: Bindings }>()
app.get('/custom-context/', (c) => {
const lambdaContext = c.env.event.requestContext
return c.json(lambdaContext)
})
export const handler = handle(app)
```
### Before v3.10.0 (deprecated)
you can access the AWS Lambda request context by binding the `ApiGatewayRequestContext` type and using `c.env.`
```ts
import { Hono } from 'hono'
import type { ApiGatewayRequestContext } from 'hono/aws-lambda'
import { handle } from 'hono/aws-lambda'
type Bindings = {
requestContext: ApiGatewayRequestContext
}
const app = new Hono<{ Bindings: Bindings }>()
app.get('/custom-context/', (c) => {
const lambdaContext = c.env.requestContext
return c.json(lambdaContext)
})
export const handler = handle(app)
```
## Lambda response streaming
By changing the invocation mode of AWS Lambda, you can achieve [Streaming Response](https://aws.amazon.com/blogs/compute/introducing-aws-lambda-response-streaming/).
```diff
fn.addFunctionUrl({
authType: lambda.FunctionUrlAuthType.NONE,
+ invokeMode: lambda.InvokeMode.RESPONSE_STREAM,
})
```
Typically, the implementation requires writing chunks to NodeJS.WritableStream using awslambda.streamifyResponse, but with the AWS Lambda Adaptor, you can achieve the traditional streaming response of Hono by using streamHandle instead of handle.
```ts
import { Hono } from 'hono'
import { streamHandle } from 'hono/aws-lambda'
import { streamText } from 'hono/streaming'
const app = new Hono()
app.get('/stream', async (c) => {
return streamText(c, async (stream) => {
for (let i = 0; i < 3; i++) {
await stream.writeln(`${i}`)
await stream.sleep(1)
}
})
})
export const handler = streamHandle(app)
```
# Google Cloud Run
[Google Cloud Run](https://cloud.google.com/run) is a serverless platform built by Google Cloud. You can run your code in response to events and Google automatically manages the underlying compute resources for you.
Google Cloud Run uses containers to run your service. This means you can use any runtime you like (E.g., Deno or Bun) by providing a Dockerfile. If no Dockerfile is provided Google Cloud Run will use the default Node.js buildpack.
This guide assumes you already have a Google Cloud account and a billing account.
## 1. Install the CLI
When working with Google Cloud Platform, it is easiest to work with the [gcloud CLI](https://cloud.google.com/sdk/docs/install).
For example, on MacOS using Homebrew:
```sh
brew install --cask gcloud-cli
```
Authenticate with the CLI.
```sh
gcloud auth login
```
## 2. Project setup
Create a project. Accept the auto-generated project ID at the prompt.
```sh
gcloud projects create --set-as-default --name="my app"
```
Create environment variables for your project ID and project number for easy reuse. It may take ~30 seconds before the project successfully returns with the `gcloud projects list` command.
```sh
PROJECT_ID=$(gcloud projects list \
--format='value(projectId)' \
--filter='name="my app"')
PROJECT_NUMBER=$(gcloud projects list \
--format='value(projectNumber)' \
--filter='name="my app"')
echo $PROJECT_ID $PROJECT_NUMBER
```
Find your billing account ID.
```sh
gcloud billing accounts list
```
Add your billing account from the prior command to the project.
```sh
gcloud billing projects link $PROJECT_ID \
--billing-account=[billing_account_id]
```
Enable the required APIs.
```sh
gcloud services enable run.googleapis.com \
cloudbuild.googleapis.com
```
Update the service account permissions to have access to Cloud Build.
```sh
gcloud projects add-iam-policy-binding $PROJECT_ID \
--member=serviceAccount:$PROJECT_NUMBER-compute@developer.gserviceaccount.com \
--role=roles/run.builder
```
## 3. Hello World
Start your project with "create-hono" command. Select `nodejs`.
```sh
npm create hono@latest my-app
```
Move to `my-app` and install the dependencies.
```sh
cd my-app
npm i
```
Update the port in `src/index.ts` to be `8080`.
```ts
import { serve } from '@hono/node-server'
import { Hono } from 'hono'
const app = new Hono()
app.get('/', (c) => {
return c.text('Hello Hono!')
})
serve({
fetch: app.fetch,
port: 3000 // [!code --]
port: 8080 // [!code ++]
}, (info) => {
console.log(`Server is running on http://localhost:${info.port}`)
})
```
Run the development server locally. Then, access http://localhost:8080 in your Web browser.
```sh
npm run dev
```
## 4. Deploy
Start the deployment and follow the interactive prompts (E.g., select a region).
```sh
gcloud run deploy my-app --source . --allow-unauthenticated
```
## Changing runtimes
If you want to deploy using Deno or Bun runtimes (or a customised Nodejs container), add a `Dockerfile` (and optionally `.dockerignore`) with your desired environment.
For information on containerizing, please refer to:
- [Node.js](/docs/getting-started/nodejs#building-deployment)
- [Bun](https://bun.com/guides/ecosystem/docker)
- [Deno](https://docs.deno.com/examples/google_cloud_run_tutorial)
# Fastly Compute
[Fastly Compute](https://www.fastly.com/products/edge-compute) is an advanced edge computing system that runs your code, in your favorite language, on Fastly's global edge network. Hono also works on Fastly Compute.
You can develop the application locally and publish it with a few commands using [Fastly CLI](https://www.fastly.com/documentation/reference/tools/cli/), which is installed locally automatically as part of the template.
## 1. Setup
A starter for Fastly Compute is available.
Start your project with "create-hono" command.
Select `fastly` template for this example.
::: code-group
```sh [npm]
npm create hono@latest my-app
```
```sh [yarn]
yarn create hono my-app
```
```sh [pnpm]
pnpm create hono my-app
```
```sh [bun]
bun create hono@latest my-app
```
```sh [deno]
deno init --npm hono my-app
```
:::
Move to `my-app` and install the dependencies.
::: code-group
```sh [npm]
cd my-app
npm i
```
```sh [yarn]
cd my-app
yarn
```
```sh [pnpm]
cd my-app
pnpm i
```
```sh [bun]
cd my-app
bun i
```
:::
## 2. Hello World
Edit `src/index.ts`:
```ts
// src/index.ts
import { Hono } from 'hono'
import { fire } from '@fastly/hono-fastly-compute'
const app = new Hono()
app.get('/', (c) => c.text('Hello Fastly!'))
fire(app)
```
> [!NOTE]
> When using `fire` (or `buildFire()`) from `@fastly/hono-fastly-compute'` at the top level of your application, it is suitable to use `Hono` from `'hono'` rather than `'hono/quick'`, because `fire` causes its router to build its internal data during the application initialization phase.
## 3. Run
Run the development server locally. Then, access `http://localhost:7676` in your Web browser.
::: code-group
```sh [npm]
npm run start
```
```sh [yarn]
yarn start
```
```sh [pnpm]
pnpm run start
```
```sh [bun]
bun run start
```
:::
## 4. Deploy
To build and deploy your application to your Fastly account, type the following command. The first time you deploy the application, you will be prompted to create a new service in your account.
If you don't have an account yet, you must [create your Fastly account](https://www.fastly.com/signup/).
::: code-group
```sh [npm]
npm run deploy
```
```sh [yarn]
yarn deploy
```
```sh [pnpm]
pnpm run deploy
```
```sh [bun]
bun run deploy
```
:::
## Bindings
In Fastly Compute, you can bind Fastly platform resources, such as KV Stores, Config Stores, Secret Stores, Backends, Access Control Lists, Named Log Streams, and Environment Variables. You can access them through `c.env`, and will have their individual SDK types.
To use these bindings, import `buildFire` instead of `fire` from `@fastly/hono-fastly-compute`. Define your [bindings](https://github.com/fastly/compute-js-context?tab=readme-ov-file#typed-bindings-with-buildcontextproxy) and pass them to [`buildFire()`](https://github.com/fastly/hono-fastly-compute?tab=readme-ov-file#basic-example) to obtain `fire`. Then use `fire.Bindings` to define your `Env` type as you construct `Hono`.
```ts
// src/index.ts
import { buildFire } from '@fastly/hono-fastly-compute'
const fire = buildFire({
siteData: 'KVStore:site-data', // I have a KV Store named "site-data"
})
const app = new Hono<{ Bindings: typeof fire.Bindings }>()
app.put('/upload/:key', async (c, next) => {
// e.g., Access the KV Store
const key = c.req.param('key')
await c.env.siteData.put(key, c.req.body)
return c.text(`Put ${key} successfully!`)
})
fire(app)
```
# Supabase Edge Functions
[Supabase](https://supabase.com/) is an open-source alternative to Firebase, offering a suite of tools similar to Firebase's capabilities, including database, authentication, storage, and now, serverless functions.
Supabase Edge Functions are server-side TypeScript functions that are distributed globally, running closer to your users for improved performance. These functions are developed using [Deno](https://deno.com/), which brings several benefits, including improved security and a modern JavaScript/TypeScript runtime.
Here's how you can get started with Supabase Edge Functions:
## 1. Setup
### Prerequisites
Before you begin, make sure you have the Supabase CLI installed. If you haven't installed it yet, follow the instructions in the [official documentation](https://supabase.com/docs/guides/cli/getting-started).
### Creating a New Project
1. Open your terminal or command prompt.
2. Create a new Supabase project in a directory on your local machine by running:
```bash
supabase init
```
This command initializes a new Supabase project in the current directory.
### Adding an Edge Function
3. Inside your Supabase project, create a new Edge Function named `hello-world`:
```bash
supabase functions new hello-world
```
This command creates a new Edge Function with the specified name in your project.
## 2. Hello World
Edit the `hello-world` function by modifying the file `supabase/functions/hello-world/index.ts`:
```ts
import { Hono } from 'jsr:@hono/hono'
// change this to your function name
const functionName = 'hello-world'
const app = new Hono().basePath(`/${functionName}`)
app.get('/hello', (c) => c.text('Hello from hono-server!'))
Deno.serve(app.fetch)
```
## 3. Run
To run the function locally, use the following command:
1. Use the following command to serve the function:
```bash
supabase start # start the supabase stack
supabase functions serve --no-verify-jwt # start the Functions watcher
```
The `--no-verify-jwt` flag allows you to bypass JWT verification during local development.
2. Make a GET request using cURL or Postman to `http://127.0.0.1:54321/functions/v1/hello-world/hello`:
```bash
curl --location 'http://127.0.0.1:54321/functions/v1/hello-world/hello'
```
This request should return the text "Hello from hono-server!".
## 4. Deploy
You can deploy all of your Edge Functions in Supabase with a single command:
```bash
supabase functions deploy
```
Alternatively, you can deploy individual Edge Functions by specifying the name of the function in the deploy command:
```bash
supabase functions deploy hello-world
```
For more deployment methods, visit the Supabase documentation on [Deploying to Production](https://supabase.com/docs/guides/functions/deploy).
# Bun
[Bun](https://bun.com) is another JavaScript runtime. It's not Node.js or Deno. Bun includes a transcompiler, so we can write the code in TypeScript or plain JavaScript.
Hono also works on Bun.
## 1. Install Bun
To install `bun` command, follow the instruction in [the official web site](https://bun.com).
## 2. Setup
### 2.1. Setup a new project
A starter for Bun is available. Start your project with "bun create" command.
Select `bun` template for this example.
```sh
bun create hono@latest my-app
```
Move into my-app and install the dependencies.
```sh
cd my-app
bun install
```
### 2.2. Setup an existing project
On an existing Bun project, we only need to install `hono` dependencies on the project root directory via
```sh
bun add hono
```
Then add the `dev` command to your existing `package.json`.
```json
{
"scripts": {
"dev": "bun run --hot src/index.ts"
}
}
```
See the [Bun starter template](https://github.com/honojs/starter/tree/main/templates/bun) for a minimal example setup. This is the output of running `bun create hono@latest`.
## 3. Hello World
"Hello World" script is below. Almost the same as writing on other platforms.
```ts
import { Hono } from 'hono'
const app = new Hono()
app.get('/', (c) => c.text('Hello Bun!'))
export default app
```
If you are setting up Hono on an existing project, the `bun run dev` command expects the "Hello World" script to be placed in `src/index.ts`
## 4. Run
Run the command.
```sh
bun run dev
```
Then, access `http://localhost:3000` in your browser.
## Change port number
You can specify the port number with exporting the `port`.
```ts
import { Hono } from 'hono'
const app = new Hono()
app.get('/', (c) => c.text('Hello Bun!'))
export default app // [!code --]
export default { // [!code ++]
port: 3000, // [!code ++]
fetch: app.fetch, // [!code ++]
} // [!code ++]
```
## Serve static files
To serve static files, use `serveStatic` which is imported from `hono/bun`.
```ts
import { serveStatic } from 'hono/bun'
const app = new Hono()
app.use('/static/*', serveStatic({ root: './' }))
app.use('/favicon.ico', serveStatic({ path: './favicon.ico' }))
app.get('/', (c) => c.text('You can access: /static/hello.txt'))
app.get('*', serveStatic({ path: './static/fallback.txt' }))
```
For the above code, it will work well with the following directory structure.
```
./
βββ favicon.ico
βββ src
βββ static
βββ demo
β βββ index.html
βββ fallback.txt
βββ hello.txt
βββ images
βββ dinotocat.png
```
### `rewriteRequestPath`
If you want to map `http://localhost:3000/static/*` to `./statics`, you can use the `rewriteRequestPath` option:
```ts
app.get(
'/static/*',
serveStatic({
root: './',
rewriteRequestPath: (path) =>
path.replace(/^\/static/, '/statics'),
})
)
```
### `mimes`
You can add MIME types with `mimes`:
```ts
app.get(
'/static/*',
serveStatic({
mimes: {
m3u8: 'application/vnd.apple.mpegurl',
ts: 'video/mp2t',
},
})
)
```
### `onFound`
You can specify handling when the requested file is found with `onFound`:
```ts
app.get(
'/static/*',
serveStatic({
// ...
onFound: (_path, c) => {
c.header('Cache-Control', `public, immutable, max-age=31536000`)
},
})
)
```
### `onNotFound`
You can specify handling when the requested file is not found with `onNotFound`:
```ts
app.get(
'/static/*',
serveStatic({
onNotFound: (path, c) => {
console.log(`${path} is not found, you access ${c.req.path}`)
},
})
)
```
### `precompressed`
The `precompressed` option checks if files with extensions like `.br` or `.gz` are available and serves them based on the `Accept-Encoding` header. It prioritizes Brotli, then Zstd, and Gzip. If none are available, it serves the original file.
```ts
app.get(
'/static/*',
serveStatic({
precompressed: true,
})
)
```
## Testing
You can use `bun:test` for testing on Bun.
```ts
import { describe, expect, it } from 'bun:test'
import app from '.'
describe('My first test', () => {
it('Should return 200 Response', async () => {
const req = new Request('http://localhost/')
const res = await app.fetch(req)
expect(res.status).toBe(200)
})
})
```
Then, run the command.
```sh
bun test index.test.ts
```
# Cloudflare Workers + Vite
You can build a full-stack application on [Cloudflare Workers](https://workers.cloudflare.com) with [Vite](https://vite.dev) using the [`@cloudflare/vite-plugin`](https://developers.cloudflare.com/workers/vite-plugin/).
This setup gives you a fast Vite dev server, server-side rendering with Hono's JSX renderer, and client-side scripts bundled by Vite β all running on Cloudflare Workers.
This is the recommended way to start a new full-stack project on Cloudflare. If you were previously using [Cloudflare Pages](/docs/getting-started/cloudflare-pages), this is its successor.
## 1. Setup
A starter for Cloudflare Workers with Vite is available.
Start your project with the "create-hono" command.
Select the `cloudflare-workers+vite` template for this example.
::: code-group
```sh [npm]
npm create hono@latest my-app
```
```sh [yarn]
yarn create hono my-app
```
```sh [pnpm]
pnpm create hono my-app
```
```sh [bun]
bun create hono@latest my-app
```
```sh [deno]
deno init --npm hono my-app
```
:::
Move into `my-app` and install the dependencies.
::: code-group
```sh [npm]
cd my-app
npm i
```
```sh [yarn]
cd my-app
yarn
```
```sh [pnpm]
cd my-app
pnpm i
```
```sh [bun]
cd my-app
bun i
```
:::
Below is a basic directory structure.
```text
./
βββ package.json
βββ public // Put your static files here.
βββ src
β βββ index.tsx // The entry point for server-side.
β βββ renderer.tsx
β βββ style.css
βββ tsconfig.json
βββ vite.config.ts
βββ wrangler.jsonc
```
The `vite.config.ts` combines the Cloudflare plugin with `vite-ssr-components` for SSR:
```ts
import { cloudflare } from '@cloudflare/vite-plugin'
import { defineConfig } from 'vite'
import ssrPlugin from 'vite-ssr-components/plugin'
export default defineConfig({
plugins: [cloudflare(), ssrPlugin()],
})
```
## 2. Hello World
Edit `src/index.tsx` like the following:
```tsx
import { Hono } from 'hono'
import { renderer } from './renderer'
const app = new Hono()
app.use(renderer)
app.get('/', (c) => {
return c.render(
Hello, Cloudflare Workers!
)
})
export default app
```
The `renderer` is defined in `src/renderer.tsx` using Hono's [JSX renderer middleware](/docs/middleware/builtin/jsx-renderer) together with `vite-ssr-components`, which wires up Vite's client and assets:
```tsx
import { jsxRenderer } from 'hono/jsx-renderer'
import { Link, ViteClient } from 'vite-ssr-components/hono'
export const renderer = jsxRenderer(({ children }) => {
return (
{children}
)
})
```
## 3. Run
Run the development server locally. Then, access `http://localhost:5173` in your web browser.
::: code-group
```sh [npm]
npm run dev
```
```sh [yarn]
yarn dev
```
```sh [pnpm]
pnpm dev
```
```sh [bun]
bun run dev
```
:::
## 4. Deploy
If you have a Cloudflare account, you can deploy to Cloudflare. The `deploy` script builds with Vite and then publishes with Wrangler.
::: code-group
```sh [npm]
npm run deploy
```
```sh [yarn]
yarn deploy
```
```sh [pnpm]
pnpm run deploy
```
```sh [bun]
bun run deploy
```
:::
## Bindings
You can use Cloudflare Bindings like Variables, KV, D1, and others.
Configure them in `wrangler.jsonc`. For example, to add a Variable named `MY_NAME`:
```jsonc
{
"$schema": "node_modules/wrangler/config-schema.json",
"name": "my-app",
"compatibility_date": "2025-08-03",
"main": "./src/index.tsx",
"vars": {
"MY_NAME": "Hono",
},
}
```
To generate the types for your Bindings, run the `cf-typegen` script:
::: code-group
```sh [npm]
npm run cf-typegen
```
```sh [yarn]
yarn cf-typegen
```
```sh [pnpm]
pnpm run cf-typegen
```
```sh [bun]
bun run cf-typegen
```
:::
This generates a `CloudflareBindings` interface. Pass it to `Hono` as generics:
```ts
const app = new Hono<{ Bindings: CloudflareBindings }>()
```
Then access the Bindings via `c.env`:
```tsx
app.get('/', (c) => {
return c.render(
Hello! {c.env.MY_NAME}
)
})
```
## Client-side
`vite-ssr-components` lets you load client-side scripts through Vite.
Add a `Script` component pointing to your client entry point, and Vite handles bundling for both dev and production:
```tsx
import { jsxRenderer } from 'hono/jsx-renderer'
import { Script, ViteClient } from 'vite-ssr-components/hono'
export const renderer = jsxRenderer(({ children }) => {
return (
{children}
)
})
```
For more details, see the [`@cloudflare/vite-plugin` documentation](https://developers.cloudflare.com/workers/vite-plugin/) and [`vite-ssr-components`](https://github.com/yusukebe/vite-ssr-components).
# Deno
[Deno](https://deno.com/) is a JavaScript runtime built on V8. It's not Node.js.
Hono also works on Deno.
You can use Hono, write the code with TypeScript, run the application with the `deno` command, and deploy it to "Deno Deploy".
## 1. Install Deno
First, install `deno` command.
Please refer to [the official document](https://docs.deno.com/runtime/getting_started/installation/).
## 2. Setup
A starter for Deno is available.
Start your project with the [`deno init`](https://docs.deno.com/runtime/reference/cli/init/) command.
```sh
deno init --npm hono --template=deno my-app
```
Move into `my-app`. For Deno, you don't have to install Hono explicitly.
```sh
cd my-app
```
## 3. Hello World
Edit `main.ts`:
```ts [main.ts]
import { Hono } from 'hono'
const app = new Hono()
app.get('/', (c) => c.text('Hello Deno!'))
Deno.serve(app.fetch)
```
## 4. Run
Run the development server locally. Then, access `http://localhost:8000` in your Web browser.
```sh
deno task start
```
## Change port number
You can specify the port number by updating the arguments of `Deno.serve` in `main.ts`:
```ts
Deno.serve(app.fetch) // [!code --]
Deno.serve({ port: 8787 }, app.fetch) // [!code ++]
```
## Serve static files
To serve static files, use `serveStatic` imported from `hono/deno`.
```ts
import { Hono } from 'hono'
import { serveStatic } from 'hono/deno'
const app = new Hono()
app.use('/static/*', serveStatic({ root: './' }))
app.use('/favicon.ico', serveStatic({ path: './favicon.ico' }))
app.get('/', (c) => c.text('You can access: /static/hello.txt'))
app.get('*', serveStatic({ path: './static/fallback.txt' }))
Deno.serve(app.fetch)
```
For the above code, it will work well with the following directory structure.
```
./
βββ favicon.ico
βββ index.ts
βββ static
βββ demo
β βββ index.html
βββ fallback.txt
βββ hello.txt
βββ images
βββ dinotocat.png
```
### `rewriteRequestPath`
If you want to map `http://localhost:8000/static/*` to `./statics`, you can use the `rewriteRequestPath` option:
```ts
app.get(
'/static/*',
serveStatic({
root: './',
rewriteRequestPath: (path) =>
path.replace(/^\/static/, '/statics'),
})
)
```
### `mimes`
You can add MIME types with `mimes`:
```ts
app.get(
'/static/*',
serveStatic({
mimes: {
m3u8: 'application/vnd.apple.mpegurl',
ts: 'video/mp2t',
},
})
)
```
### `onFound`
You can specify handling when the requested file is found with `onFound`:
```ts
app.get(
'/static/*',
serveStatic({
// ...
onFound: (_path, c) => {
c.header('Cache-Control', `public, immutable, max-age=31536000`)
},
})
)
```
### `onNotFound`
You can specify handling when the requested file is not found with `onNotFound`:
```ts
app.get(
'/static/*',
serveStatic({
onNotFound: (path, c) => {
console.log(`${path} is not found, you access ${c.req.path}`)
},
})
)
```
### `precompressed`
The `precompressed` option checks if files with extensions like `.br` or `.gz` are available and serves them based on the `Accept-Encoding` header. It prioritizes Brotli, then Zstd, and Gzip. If none are available, it serves the original file.
```ts
app.get(
'/static/*',
serveStatic({
precompressed: true,
})
)
```
## Deno Deploy
Deno Deploy is a serverless platform for running JavaScript and TypeScript applications in the cloud.
It provides a management plane for deploying and running applications through integrations like GitHub deployment.
Hono also works on Deno Deploy. Please refer to [the official document](https://docs.deno.com/deploy/manual/).
## Testing
Testing the application on Deno is easy.
You can write with `Deno.test` and use `assert` or `assertEquals` from [@std/assert](https://jsr.io/@std/assert).
```sh
deno add jsr:@std/assert
```
```ts [hello.ts]
import { Hono } from 'hono'
import { assertEquals } from '@std/assert'
Deno.test('Hello World', async () => {
const app = new Hono()
app.get('/', (c) => c.text('Please test me'))
const res = await app.request('http://localhost/')
assertEquals(res.status, 200)
})
```
Then run the command:
```sh
deno test hello.ts
```
## npm and JSR
Hono is available on both [npm](https://www.npmjs.com/package/hono) and [JSR](https://jsr.io/@hono/hono) (the JavaScript Registry). You can use either `npm:hono` or `jsr:@hono/hono` in your `deno.json`:
```json
{
"imports": {
"hono": "jsr:@hono/hono" // [!code --]
"hono": "npm:hono" // [!code ++]
}
}
```
To use middleware you need to use the [Deno directory](https://docs.deno.com/runtime/fundamentals/configuration/#custom-path-mappings) syntax in the import.
```json
{
"imports": {
"hono/": "npm:/hono/"
}
}
```
When using third-party middleware, you may need to use Hono from the same registry as the middleware for proper TypeScript type inference. For example, if using the middleware from npm, you should also use Hono from npm:
```json
{
"imports": {
"hono": "npm:hono",
"zod": "npm:zod",
"@hono/zod-validator": "npm:@hono/zod-validator"
}
}
```
We also provide many third-party middleware packages on [JSR](https://jsr.io/@hono). When using the middleware on JSR, use Hono from JSR:
```json
{
"imports": {
"hono": "jsr:@hono/hono",
"zod": "npm:zod",
"@hono/zod-validator": "jsr:@hono/zod-validator"
}
}
```
# Netlify
Netlify provides static site hosting and serverless backend services. [Edge Functions](https://docs.netlify.com/edge-functions/overview/) enables us to make the web pages dynamic.
Edge Functions support writing in Deno and TypeScript, and deployment is made easy through the [Netlify CLI](https://docs.netlify.com/cli/get-started/). With Hono, you can create the application for Netlify Edge Functions.
## 1. Setup
A starter for Netlify is available.
Start your project with "create-hono" command.
Select `netlify` template for this example.
::: code-group
```sh [npm]
npm create hono@latest my-app
```
```sh [yarn]
yarn create hono my-app
```
```sh [pnpm]
pnpm create hono my-app
```
```sh [bun]
bun create hono@latest my-app
```
```sh [deno]
deno init --npm hono my-app
```
:::
Move into `my-app`.
## 2. Hello World
Edit `netlify/edge-functions/index.ts`:
```ts
import { Hono } from 'jsr:@hono/hono'
import { handle } from 'jsr:@hono/hono/netlify'
const app = new Hono()
app.get('/', (c) => {
return c.text('Hello Hono!')
})
export default handle(app)
```
## 3. Run
Run the development server with Netlify CLI. Then, access `http://localhost:8888` in your Web browser.
```sh
netlify dev
```
## 4. Deploy
You can deploy with a `netlify deploy` command.
```sh
netlify deploy --prod
```
## `Context`
You can access the Netlify's `Context` through `c.env`:
```ts
import { Hono } from 'jsr:@hono/hono'
import { handle } from 'jsr:@hono/hono/netlify'
// Import the type definition
import type { Context } from 'https://edge.netlify.com/'
export type Env = {
Bindings: {
context: Context
}
}
const app = new Hono()
app.get('/country', (c) =>
c.json({
'You are in': c.env.context.geo.country?.name,
})
)
export default handle(app)
```
# Vercel
Vercel is the AI cloud, providing the developer tools and cloud infrastructure to build, scale, and secure a faster, more personalized web.
Hono can be deployed to Vercel with zero-configuration.
## 1. Setup
A starter for Vercel is available.
Start your project with "create-hono" command.
Select `vercel` template for this example.
::: code-group
```sh [npm]
npm create hono@latest my-app
```
```sh [yarn]
yarn create hono my-app
```
```sh [pnpm]
pnpm create hono my-app
```
```sh [bun]
bun create hono@latest my-app
```
```sh [deno]
deno init --npm hono my-app
```
:::
Move into `my-app` and install the dependencies.
::: code-group
```sh [npm]
cd my-app
npm i
```
```sh [yarn]
cd my-app
yarn
```
```sh [pnpm]
cd my-app
pnpm i
```
```sh [bun]
cd my-app
bun i
```
:::
We will use Vercel CLI to work on the app locally in the next step. If you haven't already, install it globally following [the Vercel CLI documentation](https://vercel.com/docs/cli).
## 2. Hello World
In the `index.ts` or `src/index.ts` of your project, export the Hono application as a default export.
```ts
import { Hono } from 'hono'
const app = new Hono()
const welcomeStrings = [
'Hello Hono!',
'To learn more about Hono on Vercel, visit https://vercel.com/docs/frameworks/backend/hono',
]
app.get('/', (c) => {
return c.text(welcomeStrings.join('\n\n'))
})
export default app
```
If you started with the `vercel` template, this is already set up for you.
## 3. Run
To run the development server locally:
```sh
vercel dev
```
Visiting `localhost:3000` will respond with a text response.
## 4. Deploy
Deploy to Vercel using `vc deploy`.
```sh
vercel deploy
```
## Further reading
[Learn more about Hono in the Vercel documentation](https://vercel.com/docs/frameworks/backend/hono).
# Service Worker
[Service Worker](https://developer.mozilla.org/en-US/docs/Web/API/Service_Worker_API) is a script that runs in the background of the browser to handle tasks like caching and push notifications. Using a Service Worker adapter, you can run applications made with Hono as [FetchEvent](https://developer.mozilla.org/en-US/docs/Web/API/FetchEvent) handler within the browser.
This page shows an example of creating a project using [Vite](https://vitejs.dev/).
## 1. Setup
First, create and move to your project directory:
```sh
mkdir my-app
cd my-app
```
Create the necessary files for the project. Make a `package.json` file with the following:
```json
{
"name": "my-app",
"private": true,
"scripts": {
"dev": "vite dev"
},
"type": "module"
}
```
Similarly, create a `tsconfig.json` file with the following:
```json
{
"compilerOptions": {
"target": "ES2020",
"module": "ESNext",
"lib": ["ES2020", "DOM", "WebWorker"],
"moduleResolution": "bundler"
},
"include": ["./"],
"exclude": ["node_modules"]
}
```
Next, install the necessary modules.
::: code-group
```sh [npm]
npm i hono
npm i -D vite
```
```sh [yarn]
yarn add hono
yarn add -D vite
```
```sh [pnpm]
pnpm add hono
pnpm add -D vite
```
```sh [bun]
bun add hono
bun add -D vite
```
:::
## 2. Hello World
Edit `index.html`:
```html
Hello World by Service Worker
```
`main.ts` is a script to register the Service Worker:
```ts
function register() {
navigator.serviceWorker
.register('/sw.ts', { scope: '/sw', type: 'module' })
.then(
function (_registration) {
console.log('Register Service Worker: Success')
},
function (_error) {
console.log('Register Service Worker: Error')
}
)
}
function start() {
navigator.serviceWorker
.getRegistrations()
.then(function (registrations) {
for (const registration of registrations) {
console.log('Unregister Service Worker')
registration.unregister()
}
register()
})
}
start()
```
In `sw.ts`, create an application using Hono and register it to the `fetch` event with the Service Worker adapterβs `handle` function. This allows the Hono application to intercept access to `/sw`.
```ts
// To support types
// https://github.com/microsoft/TypeScript/issues/14877
declare const self: ServiceWorkerGlobalScope
import { Hono } from 'hono'
import { handle } from 'hono/service-worker'
const app = new Hono().basePath('/sw')
app.get('/', (c) => c.text('Hello World'))
self.addEventListener('fetch', handle(app))
```
### Using `fire()`
The `fire()` function automatically calls `addEventListener('fetch', handle(app))` for you, making the code more concise.
```ts
import { Hono } from 'hono'
import { fire } from 'hono/service-worker'
const app = new Hono().basePath('/sw')
app.get('/', (c) => c.text('Hello World'))
fire(app)
```
## 3. Run
Start the development server.
::: code-group
```sh [npm]
npm run dev
```
```sh [yarn]
yarn dev
```
```sh [pnpm]
pnpm run dev
```
```sh [bun]
bun run dev
```
:::
By default, the development server will run on port `5173`. Access `http://localhost:5173/` in your browser to complete the Service Worker registration. Then, access `/sw` to see the response from the Hono application.
# Azure Functions
[Azure Functions](https://azure.microsoft.com/en-us/products/functions) is a serverless platform from Microsoft Azure. You can run your code in response to events, and it automatically manages the underlying compute resources for you.
Hono was not designed for Azure Functions at first, but with [Azure Functions Adapter](https://github.com/Marplex/hono-azurefunc-adapter), it can run on it as well.
It works with Azure Functions **V4** running on Node.js 18 or above.
## 1. Install CLI
To create an Azure Function, you must first install [Azure Functions Core Tools](https://learn.microsoft.com/en-us/azure/azure-functions/create-first-function-cli-typescript?pivots=nodejs-model-v4#install-the-azure-functions-core-tools).
On macOS
```sh
brew tap azure/functions
brew install azure-functions-core-tools@4
```
Follow this link for other OS:
- [Install the Azure Functions Core Tools | Microsoft Learn](https://learn.microsoft.com/en-us/azure/azure-functions/create-first-function-cli-typescript?pivots=nodejs-model-v4#install-the-azure-functions-core-tools)
## 2. Setup
Create a TypeScript Node.js V4 project in the current folder.
```sh
func init --typescript
```
Change the default route prefix of the host. Add this property to the root json object of `host.json`:
```json
"extensions": {
"http": {
"routePrefix": ""
}
}
```
::: info
The default Azure Functions route prefix is `/api`. If you don't change it as shown above, be sure to start all your Hono routes with `/api`
:::
Now you are ready to install Hono and the Azure Functions Adapter with:
::: code-group
```sh [npm]
npm i @marplex/hono-azurefunc-adapter hono
```
```sh [yarn]
yarn add @marplex/hono-azurefunc-adapter hono
```
```sh [pnpm]
pnpm add @marplex/hono-azurefunc-adapter hono
```
```sh [bun]
bun add @marplex/hono-azurefunc-adapter hono
```
:::
## 3. Hello World
Create `src/app.ts`:
```ts
// src/app.ts
import { Hono } from 'hono'
const app = new Hono()
app.get('/', (c) => c.text('Hello Azure Functions!'))
export default app
```
Create `src/functions/httpTrigger.ts`:
```ts
// src/functions/httpTrigger.ts
import { app } from '@azure/functions'
import { azureHonoHandler } from '@marplex/hono-azurefunc-adapter'
import honoApp from '../app'
app.http('httpTrigger', {
methods: [
//Add all your supported HTTP methods here
'GET',
'POST',
'DELETE',
'PUT',
],
authLevel: 'anonymous',
route: '{*proxy}',
handler: azureHonoHandler(honoApp.fetch),
})
```
## 4. Run
Run the development server locally. Then, access `http://localhost:7071` in your Web browser.
::: code-group
```sh [npm]
npm run start
```
```sh [yarn]
yarn start
```
```sh [pnpm]
pnpm start
```
```sh [bun]
bun run start
```
:::
## 5. Deploy
::: info
Before you can deploy to Azure, you need to create some resources in your cloud infrastructure. Please visit the Microsoft documentation on [Create supporting Azure resources for your function](https://learn.microsoft.com/en-us/azure/azure-functions/create-first-function-cli-typescript?pivots=nodejs-model-v4&tabs=windows%2Cazure-cli%2Cbrowser#create-supporting-azure-resources-for-your-function)
:::
Build the project for deployment:
::: code-group
```sh [npm]
npm run build
```
```sh [yarn]
yarn build
```
```sh [pnpm]
pnpm build
```
```sh [bun]
bun run build
```
:::
Deploy your project to the function app in Azure Cloud. Replace `` with the name of your app.
```sh
func azure functionapp publish
```
# Node.js
[Node.js](https://nodejs.org/) is an open-source, cross-platform JavaScript runtime environment.
Hono was not designed for Node.js at first, but with a [Node.js Adapter](https://github.com/honojs/node-server), it can run on Node.js as well.
::: info
It works on Node.js versions greater than 18.x. The specific required Node.js versions are as follows:
- 18.x => 18.14.1+
- 19.x => 19.7.0+
- 20.x => 20.0.0+
Essentially, you can simply use the latest version of each major release.
:::
## 1. Setup
A starter for Node.js is available.
Start your project with "create-hono" command.
Select `nodejs` template for this example.
::: code-group
```sh [npm]
npm create hono@latest my-app
```
```sh [yarn]
yarn create hono my-app
```
```sh [pnpm]
pnpm create hono my-app
```
```sh [bun]
bun create hono@latest my-app
```
```sh [deno]
deno init --npm hono my-app
```
:::
Move to `my-app` and install the dependencies.
::: code-group
```sh [npm]
cd my-app
npm i
```
```sh [yarn]
cd my-app
yarn
```
```sh [pnpm]
cd my-app
pnpm i
```
```sh [bun]
cd my-app
bun i
```
:::
## 2. Hello World
Edit `src/index.ts`:
```ts
import { serve } from '@hono/node-server'
import { Hono } from 'hono'
const app = new Hono()
app.get('/', (c) => c.text('Hello Node.js!'))
serve(app)
```
If you want to gracefully shut down the server, write it like this:
```ts
const server = serve(app)
// graceful shutdown
process.on('SIGINT', () => {
server.close()
process.exit(0)
})
process.on('SIGTERM', () => {
server.close((err) => {
if (err) {
console.error(err)
process.exit(1)
}
process.exit(0)
})
})
```
## 3. Run
Run the development server locally. Then, access `http://localhost:3000` in your Web browser.
::: code-group
```sh [npm]
npm run dev
```
```sh [yarn]
yarn dev
```
```sh [pnpm]
pnpm dev
```
:::
## Change port number
You can specify the port number with the `port` option.
```ts
serve({
fetch: app.fetch,
port: 8787,
})
```
## WebSocket
WebSocket support is built into `@hono/node-server`. Install `ws` and, if you use TypeScript, `@types/ws`. Then create a `WebSocketServer` with `{ noServer: true }` and pass it to `serve()` with the `websocket` option.
`@hono/node-ws` is deprecated.
```ts
import { serve, upgradeWebSocket } from '@hono/node-server'
import { Hono } from 'hono'
import { WebSocketServer } from 'ws'
const app = new Hono()
app.get(
'/ws',
upgradeWebSocket(() => ({
onMessage(event, ws) {
ws.send(event.data)
},
}))
)
const wss = new WebSocketServer({ noServer: true })
serve({
fetch: app.fetch,
websocket: { server: wss },
})
```
## Access the raw Node.js APIs
You can access the Node.js APIs from `c.env.incoming` and `c.env.outgoing`.
```ts
import { Hono } from 'hono'
import { serve, type HttpBindings } from '@hono/node-server'
// or `Http2Bindings` if you use HTTP2
type Bindings = HttpBindings & {
/* ... */
}
const app = new Hono<{ Bindings: Bindings }>()
app.get('/', (c) => {
return c.json({
remoteAddress: c.env.incoming.socket.remoteAddress,
})
})
serve(app)
```
## Serve static files
You can use `serveStatic` to serve static files from the local file system. For example, suppose the directory structure is as follows:
```sh
./
βββ favicon.ico
βββ index.ts
βββ static
βββ hello.txt
βββ image.png
```
If a request to the path `/static/*` comes in and you want to return a file under `./static`, you can write the following:
```ts
import { serveStatic } from '@hono/node-server/serve-static'
app.use('/static/*', serveStatic({ root: './' }))
```
::: warning
The `root` option resolves paths relative to the current working directory (`process.cwd()`). This means the behavior depends on **where you run your Node.js process from**, not where your source file is located. If you start your server from a different directory, file resolution may fail.
For reliable path resolution that always points to the same directory as your source file, use `import.meta.url`:
```ts
import { fileURLToPath } from 'node:url'
import { serveStatic } from '@hono/node-server/serve-static'
app.use(
'/static/*',
serveStatic({ root: fileURLToPath(new URL('./', import.meta.url)) })
)
```
:::
Use the `path` option to serve `favicon.ico` in the directory root:
```ts
app.use('/favicon.ico', serveStatic({ path: './favicon.ico' }))
```
If a request to the path `/hello.txt` or `/image.png` comes in and you want to return a file named `./static/hello.txt` or `./static/image.png`, you can use the following:
```ts
app.use('*', serveStatic({ root: './static' }))
```
### `rewriteRequestPath`
If you want to map `http://localhost:3000/static/*` to `./statics`, you can use the `rewriteRequestPath` option:
```ts
app.get(
'/static/*',
serveStatic({
root: './',
rewriteRequestPath: (path) =>
path.replace(/^\/static/, '/statics'),
})
)
```
## http2
You can run hono on a [Node.js http2 Server](https://nodejs.org/api/http2.html).
### unencrypted http2
```ts
import { createServer } from 'node:http2'
const server = serve({
fetch: app.fetch,
createServer,
})
```
### encrypted http2
```ts
import { createSecureServer } from 'node:http2'
import { readFileSync } from 'node:fs'
const server = serve({
fetch: app.fetch,
createServer: createSecureServer,
serverOptions: {
key: readFileSync('localhost-privkey.pem'),
cert: readFileSync('localhost-cert.pem'),
},
})
```
## Building & Deployment
::: code-group
```sh [npm]
npm run build
```
```sh [yarn]
yarn run build
```
```sh [pnpm]
pnpm run build
```
```sh [bun]
bun run build
```
::: info
Apps with a front-end framework may need to use [Hono's Vite plugins](https://github.com/honojs/vite-plugins).
:::
### Dockerfile
Here is an example of a Node.js Dockerfile.
```Dockerfile
FROM node:22-alpine AS base
FROM base AS builder
RUN apk add --no-cache gcompat
WORKDIR /app
COPY package*json tsconfig.json src ./
RUN npm ci && \
npm run build && \
npm prune --production
FROM base AS runner
WORKDIR /app
RUN addgroup --system --gid 1001 nodejs
RUN adduser --system --uid 1001 hono
COPY --from=builder --chown=hono:nodejs /app/node_modules /app/node_modules
COPY --from=builder --chown=hono:nodejs /app/dist /app/dist
COPY --from=builder --chown=hono:nodejs /app/package.json /app/package.json
USER hono
EXPOSE 3000
CMD ["node", "/app/dist/index.js"]
```
# Cloudflare Workers
[Cloudflare Workers](https://workers.cloudflare.com) is a JavaScript edge runtime on Cloudflare CDN.
You can develop the application locally and publish it with a few commands using [Wrangler](https://developers.cloudflare.com/workers/wrangler/).
Wrangler includes transcompiler, so we can write the code with TypeScript.
Letβs make your first application for Cloudflare Workers with Hono.
## 1. Setup
A starter for Cloudflare Workers is available.
Start your project with "create-hono" command.
Select `cloudflare-workers` template for this example.
::: code-group
```sh [npm]
npm create hono@latest my-app
```
```sh [yarn]
yarn create hono my-app
```
```sh [pnpm]
pnpm create hono my-app
```
```sh [bun]
bun create hono@latest my-app
```
```sh [deno]
deno init --npm hono my-app
```
:::
Move to `my-app` and install the dependencies.
::: code-group
```sh [npm]
cd my-app
npm i
```
```sh [yarn]
cd my-app
yarn
```
```sh [pnpm]
cd my-app
pnpm i
```
```sh [bun]
cd my-app
bun i
```
:::
## 2. Hello World
Edit `src/index.ts` like below.
```ts
import { Hono } from 'hono'
const app = new Hono()
app.get('/', (c) => c.text('Hello Cloudflare Workers!'))
export default app
```
## 3. Run
Run the development server locally. Then, access `http://localhost:8787` in your web browser.
::: code-group
```sh [npm]
npm run dev
```
```sh [yarn]
yarn dev
```
```sh [pnpm]
pnpm dev
```
```sh [bun]
bun run dev
```
:::
### Change port number
If you need to change the port number you can follow the instructions here to update `wrangler.toml` / `wrangler.json` / `wrangler.jsonc` files:
[Wrangler Configuration](https://developers.cloudflare.com/workers/wrangler/configuration/#local-development-settings)
Or, you can follow the instructions here to set CLI options:
[Wrangler CLI](https://developers.cloudflare.com/workers/wrangler/commands/#dev)
## 4. Deploy
If you have a Cloudflare account, you can deploy to Cloudflare. In `package.json`, `$npm_execpath` needs to be changed to your package manager of choice.
::: code-group
```sh [npm]
npm run deploy
```
```sh [yarn]
yarn deploy
```
```sh [pnpm]
pnpm run deploy
```
```sh [bun]
bun run deploy
```
:::
That's all!
## Using Hono with other event handlers
You can integrate Hono with other event handlers (such as `scheduled`) in _Module Worker mode_.
To do this, export `app.fetch` as the module's `fetch` handler, and then implement other handlers as needed:
```ts
const app = new Hono()
export default {
fetch: app.fetch,
scheduled: async (batch, env) => {},
}
```
## Serve static files
If you want to serve static files, you can use [the Static Assets feature](https://developers.cloudflare.com/workers/static-assets/) of Cloudflare Workers. Specify the directory for the files in `wrangler.jsonc`:
```jsonc
"assets": { "directory": "public" }
```
Then create theΒ `public`Β directory and place the files there. For instance, `./public/static/hello.txt` will be served as `/static/hello.txt`.
```
.
βββ package.json
βββ public
βΒ Β βββ favicon.ico
βΒ Β βββ static
βΒ Β βββ hello.txt
βββ src
βΒ Β βββ index.ts
βββ wrangler.jsonc
```
## Types
You have to install `@cloudflare/workers-types` if you want to have workers types.
::: code-group
```sh [npm]
npm i --save-dev @cloudflare/workers-types
```
```sh [yarn]
yarn add -D @cloudflare/workers-types
```
```sh [pnpm]
pnpm add -D @cloudflare/workers-types
```
```sh [bun]
bun add --dev @cloudflare/workers-types
```
:::
## Testing
For testing, we recommend using `@cloudflare/vitest-pool-workers`.
Refer to [examples](https://github.com/honojs/examples) for setting it up.
If there is the application below.
```ts
import { Hono } from 'hono'
const app = new Hono()
app.get('/', (c) => c.text('Please test me!'))
```
We can test if it returns "_200 OK_" Response with this code.
```ts
describe('Test the application', () => {
it('Should return 200 response', async () => {
const res = await app.request('http://localhost/')
expect(res.status).toBe(200)
})
})
```
## Bindings
In the Cloudflare Workers, we can bind the environment values, KV namespace, R2 bucket, or Durable Object. You can access them in `c.env`. It will have the types if you pass the "_type definition_" for the bindings to the `Hono` as generics.
```ts
type Bindings = {
MY_BUCKET: R2Bucket
USERNAME: string
PASSWORD: string
}
const app = new Hono<{ Bindings: Bindings }>()
// Access to environment values
app.put('/upload/:key', async (c, next) => {
const key = c.req.param('key')
await c.env.MY_BUCKET.put(key, c.req.body)
return c.text(`Put ${key} successfully!`)
})
```
## Using Variables in Middleware
This is the only case for Module Worker mode.
If you want to use Variables or Secret Variables in Middleware, for example, "username" or "password" in Basic Authentication Middleware, you need to write like the following.
```ts
import { basicAuth } from 'hono/basic-auth'
type Bindings = {
USERNAME: string
PASSWORD: string
}
const app = new Hono<{ Bindings: Bindings }>()
//...
app.use('/auth/*', async (c, next) => {
const auth = basicAuth({
username: c.env.USERNAME,
password: c.env.PASSWORD,
})
return auth(c, next)
})
```
The same is applied to Bearer Authentication Middleware, JWT Authentication, or others.
## Deploy from GitHub Actions
Before deploying code to Cloudflare via CI, you need a Cloudflare token. You can manage it from [User API Tokens](https://dash.cloudflare.com/profile/api-tokens).
If it's a newly created token, select the **Edit Cloudflare Workers** template. If you already have another token, make sure the token has the corresponding permissions. (Note: token permissions are not shared between Cloudflare Pages and Cloudflare Workers).
then go to your GitHub repository settings dashboard: `Settings->Secrets and variables->Actions->Repository secrets`, and add a new secret with the name `CLOUDFLARE_API_TOKEN`.
then create `.github/workflows/deploy.yml` in your Hono project root folder, paste the following code:
```yml
name: Deploy
on:
push:
branches:
- main
jobs:
deploy:
runs-on: ubuntu-latest
name: Deploy
steps:
- uses: actions/checkout@v4
- name: Deploy
uses: cloudflare/wrangler-action@v3
with:
apiToken: ${{ secrets.CLOUDFLARE_API_TOKEN }}
```
then edit `wrangler.jsonc`, and add this code after the `compatibility_date` line.
```jsonc
"main": "src/index.ts",
"minify": true
```
Everything is ready! Now push the code and enjoy it.
## Load env when local development
To configure the environment variables for local development, create a `.dev.vars` file or a `.env` file in the root directory of the project.
These files should be formatted using the [dotenv](https://hexdocs.pm/dotenvy/dotenv-file-format.html) syntax. For example:
```
SECRET_KEY=value
API_TOKEN=eyJhbGciOiJIUzI1NiIsInR5cCI6IkpXVCJ9
```
> For more about this section you can find in the Cloudflare documentation:
> https://developers.cloudflare.com/workers/wrangler/configuration/#secrets
Then we use the `c.env.*` to get the environment variables in our code.
::: info
By default, `process.env` is not available in Cloudflare Workers, so it is recommended to get environment variables from `c.env`. If you want to use it, you need to enable [`nodejs_compat_populate_process_env`](https://developers.cloudflare.com/workers/configuration/compatibility-flags/#enable-auto-populating-processenv) flag. You can also import `env` from `cloudflare:workers`. For details, please see [How to access `env` on Cloudflare docs](https://developers.cloudflare.com/workers/runtime-apis/bindings/#how-to-access-env)
:::
```ts
type Bindings = {
SECRET_KEY: string
}
const app = new Hono<{ Bindings: Bindings }>()
app.get('/env', (c) => {
const SECRET_KEY = c.env.SECRET_KEY
return c.text(SECRET_KEY)
})
```
Before you deploy your project to Cloudflare, remember to set the environment variable/secrets in the Cloudflare Workers project's configuration.
> For more about this section you can find in the Cloudflare documentation:
> https://developers.cloudflare.com/workers/configuration/environment-variables/#add-environment-variables-via-the-dashboard
# Alibaba Cloud Function Compute
[Alibaba Cloud Function Compute](https://www.alibabacloud.com/en/product/function-compute) is a fully managed, event-driven compute service. Function Compute allows you to focus on writing and uploading code without having to manage infrastructure such as servers.
This guide uses a third-party adapter [rwv/hono-alibaba-cloud-fc3-adapter](https://github.com/rwv/hono-alibaba-cloud-fc3-adapter) to run Hono on Alibaba Cloud Function Compute.
## 1. Setup
::: code-group
```sh [npm]
mkdir my-app
cd my-app
npm i hono hono-alibaba-cloud-fc3-adapter
npm i -D @serverless-devs/s esbuild
mkdir src
touch src/index.ts
```
```sh [yarn]
mkdir my-app
cd my-app
yarn add hono hono-alibaba-cloud-fc3-adapter
yarn add -D @serverless-devs/s esbuild
mkdir src
touch src/index.ts
```
```sh [pnpm]
mkdir my-app
cd my-app
pnpm add hono hono-alibaba-cloud-fc3-adapter
pnpm add -D @serverless-devs/s esbuild
mkdir src
touch src/index.ts
```
```sh [bun]
mkdir my-app
cd my-app
bun add hono hono-alibaba-cloud-fc3-adapter
bun add -D esbuild @serverless-devs/s
mkdir src
touch src/index.ts
```
:::
## 2. Hello World
Edit `src/index.ts`.
```ts
import { Hono } from 'hono'
import { handle } from 'hono-alibaba-cloud-fc3-adapter'
const app = new Hono()
app.get('/', (c) => c.text('Hello Hono!'))
export const handler = handle(app)
```
## 3. Setup serverless-devs
> [serverless-devs](https://github.com/Serverless-Devs/Serverless-Devs) is an open source and open serverless developer platform dedicated to providing developers with a powerful tool chain system. Through this platform, developers can not only experience multi cloud serverless products with one click and rapidly deploy serverless projects, but also manage projects in the whole life cycle of serverless applications, and combine serverless devs with other tools / platforms very simply and quickly to further improve the efficiency of R & D, operation and maintenance.
Add the Alibaba Cloud AccessKeyID & AccessKeySecret
```sh
npx s config add
# Please select a provider: Alibaba Cloud (alibaba)
# Input your AccessKeyID & AccessKeySecret
```
Edit `s.yaml`
```yaml
edition: 3.0.0
name: my-app
access: 'default'
vars:
region: 'us-west-1'
resources:
my-app:
component: fc3
props:
region: ${vars.region}
functionName: 'my-app'
description: 'Hello World by Hono'
runtime: 'nodejs20'
code: ./dist
handler: index.handler
memorySize: 1024
timeout: 300
```
Edit `scripts` section in `package.json`:
```json
{
"scripts": {
"build": "esbuild --bundle --outfile=./dist/index.js --platform=node --target=node20 ./src/index.ts",
"deploy": "s deploy -y"
}
}
```
## 4. Deploy
Finally, run the command to deploy:
```sh
npm run build # Compile the TypeScript code to JavaScript
npm run deploy # Deploy the function to Alibaba Cloud Function Compute
```